 This post was made in partnership with Tequila Cazadores. Recipes and ideas are my own.
We have a tangelo tree in our backyard. It’s the only citrus tree that has not succumbed to years of neglect in the jungle outside our backdoor; it is tenacious to say the least. This year, after finally cutting back the honeysuckle that was blocking most of the sunlight from hitting its leaves, it produced an insane amount of fruit. Smaller than what we’ve got in years past, but abundant. It’s not a fruit I like to sit and just eat, so I make things like Tangelo-cello out of it, or use it in syrups, or just put in a box marked “free” in my driveway and pass on the burden to my neighbors.
 Last month I wrote about making squash, a syrup whose liquid content is comprised primarily of juice, for Simply Recipes. And that got me thinking about juice content in Margaritas. Now, a straight up Margarita with just enough lime juice is a beautiful thing, but sometimes I like to change it up with flavors. My biggest pet peeve though in restaurants and bars is when they up charge you for a fancy Margarita in a big ass glass and what you realize you’ve gotten is mostly orange juice with a teeny tiny amount of tequila in it. Blarg!
 What I wanted to do here is recreate some of those sweet and flavorful citrus notes without watering down my Margarita to the point of making it a breakfast drink. That’s when I thought that a squash syrup might work in this case. And then I could celebrate National Margarita Day on February 22 with a big batch of these! Oh yeah, it’s that wonderful time of the year already!
As many of you know, we partnered with Tequila Cazadores, an authentic Mexican tequila brand, last year because we have been big fans of this tequila for years and love their commitment to sustainability and ethical business practices. We’re using their Blanco expression here for this Margarita, made with 100% blue agave, because of its clean taste and soft finish. It doesn’t fight with the other ingredients, but also doesn’t get lost in the flavors. It’s just a straight up delicious tequila.
 Like I mentioned above, a squash uses a high ratio of juice to water in making a syrup. So, you can do 4:1 juice to water, or 1:1 juice to sugar with no water, something like that. Then you either shake it up until the sugar dissolves (cold process), or warm your mixture until the sugar dissolves (hot process). Today I went a step further and reduced the syrup down almost by half to get a thick, viscous syrup to use in drinks. By doing this, it’s the consistency of a rich syrup, and there are deep, caramelized citrus flavors while still also tasting tangy and bright.
 I am using mixed citrus here since I also had a delivery of Meyer lemons from my grandparents I did not want to let go to waste. Honestly, any mix of lemons, oranges, or other citrus could be used here so feel free to experiment.
When used in this Margarita, the drink is sweet, tart, with sharp caramelized flavors from the Meyer lemon and Tangelo squash syrup. Subtle agave and grassy flavors from the Tequila Cazadores Blanco contrast with the floral hints from the lime. There is a juiciness to the flavor without tasting watered down, and a nice mouth feel from the viscosity of the syrup.
 Mixed Citrus Margarita
2 ounces Tequila Cazadores Blanco
1 ounce Tangelo-Meyer Lemon Squash (see recipe below)
1/4 ounce lime juice
small pinch kosher salt
In a shaker filled 2/3 with ice, add in the Tequila Cazadores Blanco, Tangelo-Meyer Lemon Squash syrup, lime juice and small pinch of salt. Shake well 20 seconds and strain into a rocks glass filled with fresh ice. Serve with a tangelo wheel.
Tangelo-Meyer Lemon Squash
1/2 cup freshly squeezed tangelo juice
1/2 cup freshly squeezed Meyer lemon juice
1/4 cup water
1 cup sugar
In a medium, heavy bottomed saucepan, combine both fruit juices, water, and sugar. Stir to combine and bring to a boil over medium-high heat. Once a boil is reached, reduce heat to medium-low and simmer until syrup reduces by half. Depending on your stove, that can take anywhere from 15-30 minutes. Let cool to room temperature when finished and either use right away, or store in an airtight container in the fridge up to one month.

 Instead of hitting the Black Friday sales today (and let’s face it, it’s slim picking at this point since they all started on Monday anyways), let’s hit the home bar and think ahead towards the next several weeks. It’s going to be busy… you should have some cocktails ready.
 Now, I named this spin on a Black Manhattan “Black Christmas” because it’s mostly a Black Manhattan with a touch of Allspice Liqueur, which is pretty much Christmas in a bottle. I did not name it to coincide with the remake of Black Christmas that is being released in a few weeks. If anything, IÂ may have had the original Black Christmas movie in my head when naming it, not a remake, let’s be clear on this.
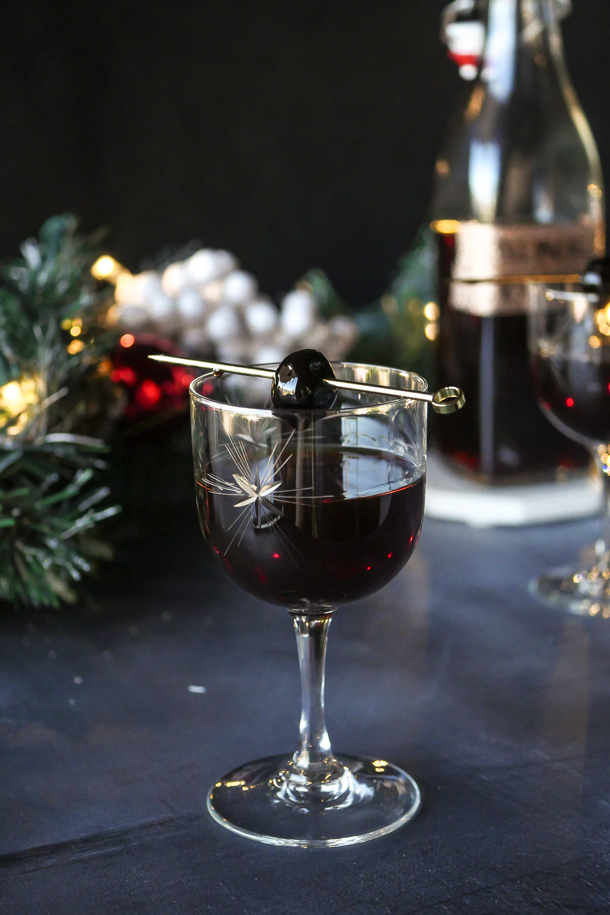
 And the best part of all this? It’s bottled with a water dilution so it just needs to chill and it’s ready to serve. No ice needed! No stirring! No fuss! Just what you need around the holidays to give you a few extra minutes of peace.
 Black Christmas Bottled Cocktail
 We are back this month with another fun Make or Buy project, which also just happens to be something you can shelve away for holiday presents later this year. Today, we’re talking Luxardo Cherries.
 Depending on where you live in the country, cherry season is any time between April and August. So technically we’re really right at the end of the season. Cherries might start to lose some of their flavor now, but fear not, they’ll still be tasty after a long bath in Luxardo.
 Homemade maraschino cherries are going to look a bit different from the jarred cherries you might be used to. If I say “maraschino cherry” and you picture something bright red, well, this will be way different for you. If you’re used to Luxardo or Amarena you might be expecting a thick syrup. Well, sorry to say this, but that thick syrup is usually the result of the additive glucose into the mix. The homemade cherries here are in a much lighter syrup but I’ve given a note in the recipe if you’re looking for more viscosity.
 Now, even with the note about glucose in the syrup, Luxardo cherries are still a delicious store bought brand and unless you’ve canned a bunch of jars in the summer, you’re going need to restock at the store. Luxardo cherries also feel very luxe, and quite frankly, are really easy to eat. So let’s look at the pros and cons of each.
 Homemade Luxardo Cherries
 This post was made in partnership with
  Sweet cocktails can many times feel too heavy, like you’ve just drank a bowl of ice cream, and honestly, no one should have to endure that. What I like about this drink is that while it leans towards a dessert it most definitely is not heavy. It walks the line between being light while also having a nice richness to it. That unexpected smoky flavor also gives it depth. Sound good so far?
 I’m back again with Kerrygold Irish Cream, who provide some richness with cream and a touch of chocolate to the drink. I thought that those chocolate notes would pair really well with some dried Oaxacan chiles I had in my pantry which have a sweet, smoky aroma to them. If you can’t find any Oaxacan chiles, try guajillo peppers instead. I also wanted to punch up the chocolate factor here and added in some chocolate liqueur (and if you’ve been following along with my summer recipes then here’s another recipe with chocolate liqueur for you to try!). Lastly, to round it out I added in some lime juice for balance.
 Kerrygold Chocolate Chile Cocktail

 Mint and chocolate are such a perfect pairing in my mind that every time my husband tells me he ABHORS the two flavors together I want to throw a shoe at him. The nerve! It’s SO good! And I hope you all agree with me!
 As some of you might know, I’ve teamed up with Kerrygold Irish Cream this summer to create some FUN recipes to enjoy in these warm months (Southern Hemisphere readers, bookmark these for your summer!). And today, Kerrygold Irish Cream is kicking in some creamy, chocolate flavors with a touch of Irish Whiskey with these minty fresh popsicles. To make them extra rich, we’re using two types of coconut milk, and a touch of chocolate liqueur for additional chocolate flavor! These aren’t dairy free (because Kerrygold has cream in it) but I find that using the coconut milk creates a much richer popsicle with a better mouth feel. Sometimes just milk creates an “icy” popsicle and I wasn’t looking for that here. Optionally, I’ve also added as a topping some white chocolate that I’ve colored green… reminiscent of that classic ice cream color. Also, I like any excuse to create some magic shell.
 Kerrygold Mint Chocolate Popsicles
 In this month’s Make or Buy series we’re thinking ahead to the holidays. Yes… I’m aware that’s 6 months away, but with this ingredient you need to think into the future. Far, far into the future. Because today we’re making vanilla extract.
 Before we get into the pros and cons of the homemade versus the store bought, I just wanted to let you know a little about vanilla beans. For one, if you decide to go the homemade route, you may run into some sticker shock when you see bean prices. Vanilla beans, you see, are a huge pain in the butt to grow. They require very high humidity environments, the flowers need to be hand pollinated (where you get a little flower dust from one plant and paint it onto another plant), and the flower blooms in like, one day and you only have that one day to pollinate the plant. Once the pods are picked, they need to cure in the sun for upwards of a year. It’s labor intensive work done by humans, humans who should be paid a living wage for their work, and that comes with a price tag. You will find vanilla beans from places like Madagascar, Papua New Guinea, and Mexico as well as a score of other places. There are two main types of vanilla: Tahitian and Planifolia. However, that in combination with where they are grown produces their unique flavors and aromas. I’d suggest doing some research first and decide what flavor profile you’d prefer before going the homemade route. One last note: grade type. There are Grade A and Grade B vanilla beans. Grade B is for extract, so buy those.
 I have two store bought vanillas that I interchangeably use and I thought I’d present both here because they represent two ends of the store bought spectrum, the not too pricey grocery store variety, and the fancier, way more expensive variety. Depending on your budget and need, these are both great buys for a ready made vanilla. I happen to live near the grocery store Sprouts so I’ve been using their organic vanilla extract and that is fine. However, I also occasionally splurge and purchase Nielsen-Massey vanilla as well. There was a time that because of my job, I could purchase this practically at cost and I got very used to their awesome vanillas and other products, but they are definitely on the higher end as far as vanillas go. The Nielsen-Massey vanillas have more varieties to choose from, and therefor one can get more of the type of vanilla they are looking for. For example, their Tahitian is more flowery, while their Madagascar Bourbon is more robust. These flavors do come across in the final products you use them in, but if you’re just looking to add a touch of vanilla to some cookies you’re fine with both. However, if you’re looking for vanilla aromas to use in a cocktail where it needs to work with the other ingredients, you may want to go for the higher end product.
 Updated August 30, 2025
 Strawberry liqueur is super versatile, and I think especially tasty during the summer, but also nice to have on hand as summer turns towards fall. You can splash it into some club soda, flavor a multitude of cocktails, but my most favorite way is to use it in a Margarita (because of course!). If you make it, please let me know how you use YOUR bottle!
 To Buy:
  To Make: Strawberry Liqueur
 And how do they compare in a cocktail? Well, of course I had to try both liqueurs out in my Strawberry Margarita recipe. Usually I would also add fresh strawberries in, but since I was testing out to compare side by side with the liqueurs I left them out (but I do highly suggest adding a few slices and muddling them in!). The store bought liqueur had a strong strawberry taste and slightly spicy flavor added to the Margarita. The color was significantly darker as well. The homemade liqueur Margarita was lighter in flavor, color, and body. Not necessarily a bad thing, just different. Both were definitely strawberry in aroma but each one on opposite ends of flavor and color.
 As much as I love a delicately twisted lemon peel, or light up ice cube, hands down my favorite cocktail garnish is a cocktail onion. That combination of sweet onion, still crunchy, in a spiced vinegar brine hits all the right notes for me. So, today we’ll compare my homemade recipe versus store bought for this month’s Make or Buy post!
 Now, there are not as many cocktail recipes that call for a cocktail onion for a garnish as opposed to, let’s say, an orange peel. But this doesn’t mean it should be relegated to an afterthought in Sunday’s bottomless Bloody Mary brunch. The austere Martini gets transformed into the cheerful Gibson by simply removing the olives (or lemon twist), and adding a cocktail onion. A Spanish-style gin and tonic gets a briny boost from the addition of a cocktail onion or two. And if you’re making the Indian Fresh Lime Soda Sweet and Salty (see my
  Your grocery store probably carries a perfectly fine version of cocktail onions (and if not, there’s always Amazon). I’ve also learned that there are a lot of regional varieties that stores carry, and there’s many farmer’s markets out there with people selling their own version of these pickled vegetables. Because there’s SO much variety out there with this product, I tried to find one that a. I like and b. that is not too hard to come by.
 To Buy:
  Homemade Cocktail Onions
 Squeeeezing in here at the end of the month (and what a month…. so glad it’s over), this might just be our easiest DIY of the bunch so far. If you can boil some water, you can make… Coffee Liqueur.
 For today’s post, we’ll be comparing coffee liqueur made with cold brew coffee. I have seen some infusions with coffee beans, and while we’ve done something similar for cocktails around here before, since the coffee liqueur that can be bought is made with cold brew, it made sense to match apples to apples. Also, since many of these posts have some content that is repeated in the pros and cons, I’ve decided to bullet point each to make it a bit easier to read and streamlined. Let me know what you think in the comments or through social; I’m here for you.
 To Buy:
 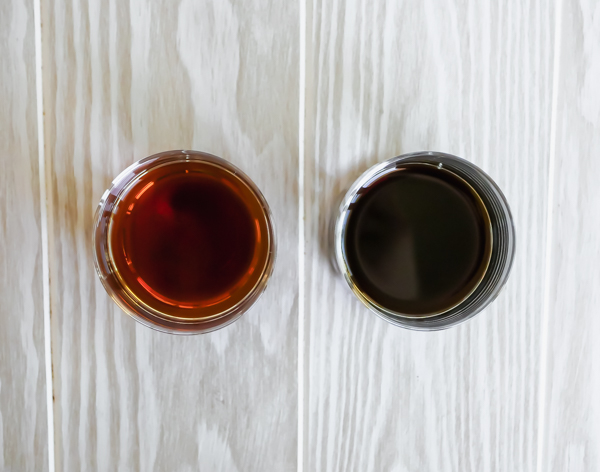 To Make: Homemade Cold Brew Coffee Liqueur (aged rum base)

 This post was made in partnership with Truvia®. Recipes and ideas are my own.
 My very first post on this site was for a Hot Buttered Rum, and it’s been almost that long since I’ve made one again. Today I thought I’d change that and bring you all something with a hint of spring, but that’s still warm and cozy. If the idea of florals in your cocktails makes you a bit wary, I can assure you, this isn’t going to taste like someone dumped your grandmother’s potpourri in your cup.
 We’ve teamed up with Truvia to add some sweetness to your cup today. The Truvia Natural Sweetener packets make recipe time so easy and we’ve got two uses for them in our recipes below. The pre-portioned packets mean one less measuring spoon to wash as we’ll need one packet per cup. We’ll also use the packets to crystalize a few rose petals and make the most gorgeous garnish for your cocktail.
 Adding butter to a hot drink feels way more common today than it did when I first started writing on there. Now, everyone is putting butter in their coffee or tea… they’re just learning how rich and delicious it makes sipping their drink. In much the same way adding an egg white to a chilled cocktail gives a silky mouthfeel to the drink, adding butter to a hot cocktail has a similar effect. It also feels slightly indulgent, but since we’re using Truvia to sweeten the drink, it’s made with less sugar than if we used ordinary cane sugar.
 And the taste? There are lots of warm baking spices mixed in from the aged rum and the butter mix. The roses give a very subtle aroma to the drink when you lean in to take a sip, and the flavors mingle well together with those spices. Make this an indulgent cup to have for a “High Tea” or make a batch for a weekend afternoon get-together.
 Rose and Spice Hot Buttered Rum
 Crystalized Rose Petals