 We are back this month with another fun Make or Buy project, which also just happens to be something you can shelve away for holiday presents later this year. Today, we’re talking Luxardo Cherries.
There are lots of recipes for using other liquors when it comes to preserving cherries. Brandied cherries are very popular, but I’ve also seen whiskey and rum used. And while I happen to have some other varieties of this booze soaked fruit in a my pantry (including the newest addition from Copper & Kings), the Luxardo brand has been in my house the longest. And I happen to have had a bottle of Luxardo Maraschino liqueur that needed to get used, so I thought now would be a good time for a homemade batch.
 Depending on where you live in the country, cherry season is any time between April and August. So technically we’re really right at the end of the season. Cherries might start to lose some of their flavor now, but fear not, they’ll still be tasty after a long bath in Luxardo.
 Homemade maraschino cherries are going to look a bit different from the jarred cherries you might be used to. If I say “maraschino cherry” and you picture something bright red, well, this will be way different for you. If you’re used to Luxardo or Amarena you might be expecting a thick syrup. Well, sorry to say this, but that thick syrup is usually the result of the additive glucose into the mix. The homemade cherries here are in a much lighter syrup but I’ve given a note in the recipe if you’re looking for more viscosity.
 Now, even with the note about glucose in the syrup, Luxardo cherries are still a delicious store bought brand and unless you’ve canned a bunch of jars in the summer, you’re going need to restock at the store. Luxardo cherries also feel very luxe, and quite frankly, are really easy to eat. So let’s look at the pros and cons of each.
To buy: Luxardo Cherries
- Pros:
- Available all year round
- Consistent flavor
- Ready made
- Cons:
- Contains additives
- High price point
- Unable to change flavor profile
To make: homemade Luxardo Cherries
- Pros:
- Easy to make
- Can change the flavor profile and/or syrup consistency to suit tastes
- Tastes of fresh cherries
- Cons:
- You have to make the product
- Sourcing Luxardo liqueur may be difficult depending on your area
- Must can the cherries for them to last longer than a month
 Homemade Luxardo Cherries
- 1 pound cherries, pitted
- 1 cup water
- 1 cup plus 2 tablespoons granulated sugar
- 1 cinnamon stick
- 1 lemon peel
- 5 black peppercorns
- pinch of freshly grated nutmeg
- pinch of salt
- 1 cup Luxardo liqueur
First, optionally remove stems if you have not so done already. Next, in a medium sized saucepan, combine water, sugar, cinnamon stick, lemon peel, peppercorns, nutmeg, and salt. Stir to dissolve sugar and bring to just under a boil. Lower heat to a simmer for 5 minutes and then stir in cherries. Coat cherries in the syrup and then remove from heat. Stir in the Luxardo liqueur and let mixture sit until cooled. At this point you can store the cherries in the fridge up to one month, or you can can them and store in a cool, dry place.
Note: if you would like a thicker syrup for your cherries, you can do one, two, or a combination of things. First, make a richer syrup with a 2:1 sugar to water ratio. Second, you can add in marasca cherry juice that you can reduced by half into the mix. This will some additional mouthfeel and an even more pronounced cherry flavor. Third, you can combine both the richer syrup and cherry juice and reduce to a thick syrup.

Love our serving pieces? Check out what’s happening in our Etsy shop for props, vintage pieces, tiki mugs & accessories, and assorted entertaining must haves!
 In this month’s Make or Buy series we’re thinking ahead to the holidays. Yes… I’m aware that’s 6 months away, but with this ingredient you need to think into the future. Far, far into the future. Because today we’re making vanilla extract.
 Before we get into the pros and cons of the homemade versus the store bought, I just wanted to let you know a little about vanilla beans. For one, if you decide to go the homemade route, you may run into some sticker shock when you see bean prices. Vanilla beans, you see, are a huge pain in the butt to grow. They require very high humidity environments, the flowers need to be hand pollinated (where you get a little flower dust from one plant and paint it onto another plant), and the flower blooms in like, one day and you only have that one day to pollinate the plant. Once the pods are picked, they need to cure in the sun for upwards of a year. It’s labor intensive work done by humans, humans who should be paid a living wage for their work, and that comes with a price tag. You will find vanilla beans from places like Madagascar, Papua New Guinea, and Mexico as well as a score of other places. There are two main types of vanilla: Tahitian and Planifolia. However, that in combination with where they are grown produces their unique flavors and aromas. I’d suggest doing some research first and decide what flavor profile you’d prefer before going the homemade route. One last note: grade type. There are Grade A and Grade B vanilla beans. Grade B is for extract, so buy those.
 I have two store bought vanillas that I interchangeably use and I thought I’d present both here because they represent two ends of the store bought spectrum, the not too pricey grocery store variety, and the fancier, way more expensive variety. Depending on your budget and need, these are both great buys for a ready made vanilla. I happen to live near the grocery store Sprouts so I’ve been using their organic vanilla extract and that is fine. However, I also occasionally splurge and purchase Nielsen-Massey vanilla as well. There was a time that because of my job, I could purchase this practically at cost and I got very used to their awesome vanillas and other products, but they are definitely on the higher end as far as vanillas go. The Nielsen-Massey vanillas have more varieties to choose from, and therefor one can get more of the type of vanilla they are looking for. For example, their Tahitian is more flowery, while their Madagascar Bourbon is more robust. These flavors do come across in the final products you use them in, but if you’re just looking to add a touch of vanilla to some cookies you’re fine with both. However, if you’re looking for vanilla aromas to use in a cocktail where it needs to work with the other ingredients, you may want to go for the higher end product.
 Updated August 30, 2025
 Strawberry liqueur is super versatile, and I think especially tasty during the summer, but also nice to have on hand as summer turns towards fall. You can splash it into some club soda, flavor a multitude of cocktails, but my most favorite way is to use it in a Margarita (because of course!). If you make it, please let me know how you use YOUR bottle!
 To Buy:
  To Make: Strawberry Liqueur
 And how do they compare in a cocktail? Well, of course I had to try both liqueurs out in my Strawberry Margarita recipe. Usually I would also add fresh strawberries in, but since I was testing out to compare side by side with the liqueurs I left them out (but I do highly suggest adding a few slices and muddling them in!). The store bought liqueur had a strong strawberry taste and slightly spicy flavor added to the Margarita. The color was significantly darker as well. The homemade liqueur Margarita was lighter in flavor, color, and body. Not necessarily a bad thing, just different. Both were definitely strawberry in aroma but each one on opposite ends of flavor and color.
 As much as I love a delicately twisted lemon peel, or light up ice cube, hands down my favorite cocktail garnish is a cocktail onion. That combination of sweet onion, still crunchy, in a spiced vinegar brine hits all the right notes for me. So, today we’ll compare my homemade recipe versus store bought for this month’s Make or Buy post!
 Now, there are not as many cocktail recipes that call for a cocktail onion for a garnish as opposed to, let’s say, an orange peel. But this doesn’t mean it should be relegated to an afterthought in Sunday’s bottomless Bloody Mary brunch. The austere Martini gets transformed into the cheerful Gibson by simply removing the olives (or lemon twist), and adding a cocktail onion. A Spanish-style gin and tonic gets a briny boost from the addition of a cocktail onion or two. And if you’re making the Indian Fresh Lime Soda Sweet and Salty (see my
  Your grocery store probably carries a perfectly fine version of cocktail onions (and if not, there’s always Amazon). I’ve also learned that there are a lot of regional varieties that stores carry, and there’s many farmer’s markets out there with people selling their own version of these pickled vegetables. Because there’s SO much variety out there with this product, I tried to find one that a. I like and b. that is not too hard to come by.
 To Buy:
  Homemade Cocktail Onions
 Squeeeezing in here at the end of the month (and what a month…. so glad it’s over), this might just be our easiest DIY of the bunch so far. If you can boil some water, you can make… Coffee Liqueur.
 For today’s post, we’ll be comparing coffee liqueur made with cold brew coffee. I have seen some infusions with coffee beans, and while we’ve done something similar for cocktails around here before, since the coffee liqueur that can be bought is made with cold brew, it made sense to match apples to apples. Also, since many of these posts have some content that is repeated in the pros and cons, I’ve decided to bullet point each to make it a bit easier to read and streamlined. Let me know what you think in the comments or through social; I’m here for you.
 To Buy:
 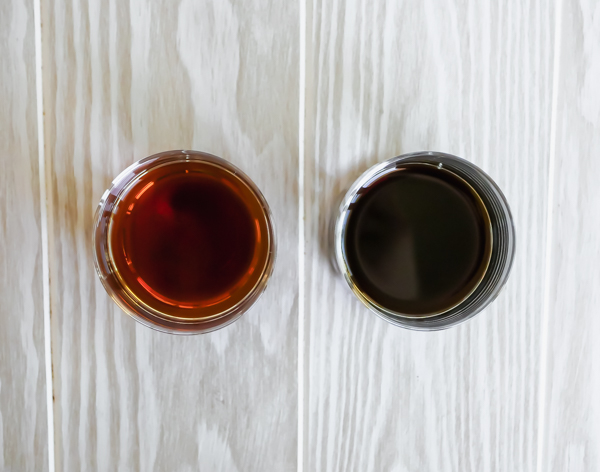 To Make: Homemade Cold Brew Coffee Liqueur (aged rum base)

 What is this crazy word you ask?! Well, if your drinks don’t tend to end up in the Tiki spectrum, then you might not be familiar with this cocktail ingredient. OH! But don’t leave us yet! Falernum is a sweet, spicy, and delicious liqueur (or syrup if made nonalcoholic) that can pep up your drinks this winter and we’re going to jump right in and let you decide… drum roll please… whether you should MAKE OR BUY Falernum!
 Our monthly series brings us to the island of Barbados, where our “buy” suggestion, Velvet Falernum, the ubiquitous bottle associated with this particular cocktail ingredient is from. This has been the only alcoholic version available to purchase that I have seen. If you’ve come across another, please let us know! I was first introduced to Velvet Falernum when I started making drinks from
  On the other hand, making Falernum, whether as a lightly alcoholic liqueur or as just a syrup, is fairly easy to do and you might just have most of the ingredients on hand to do so (although I buy whole spices in bulk and often tend to have ingredients like whole cloves available). Besides being easy to make, another pro for a homemade version is that you can make it to your specifications (change out the base rum, more or less clove or ginger, etc…). The con is that it does take a few days to make, will only last refrigerated for about a month, and that from one batch to another it’s not going to necessarily taste the same. Also, you need to invest in some ingredients first to make this. Lastly, as with all the DIY versions, you have to make it. And if that’s a chore, the DIY version is not for you.
 And how do they compare in a cocktail? The quintessential Bajan cocktail is the Corn ‘n’ Oil so of course I tested out the two in this drink. Recipe is below if you’d like to try your own. With the Velvet Falernum version, the drink was lighter in body with a lime heavy flavor. The black strap rum was also more prominent. For the homemade falernum cocktail, the taste was more complex and slightly sweeter with fresh lime and zingy ginger being dominate. The color on each of the cocktails was the same, probably to do with the darkness of the rum overpowering any differences in the color of the falernums.
 A few notes:
 Falernum


 Allspice liqueur. Allspice dram. Pimento dram. Christmas in a bottle. Whatever you call it, this fragrant, spicy liqueur is an essential item in lots of drinks, especially of the Tiki kind. In fact, I believe the first time I came across this ingredient was while I was trying to make all the drinks from Jeff “Beachbum” Berry’s classic cocktail book,
  Luckily in my search to source hard to find ingredients two things happened:
 Let’s start with what you can buy. While there are a few companies making the product, the first one I found on the market, and the brand that I’ve found the easiest to buy, is
  On the other hand you can make the liqueur. Allspice berries can be found in
  There are definite pros and cons for each option. While St. Elizabeth Allspice Dram is easy to come by where I am, and I’m in a state that I can get liquor shipped to my house, YOU might not have either option available to you. And while anyone can get some allspice berries shipped to their house, YOU may or may not be into a project that will take up to a month to get a finished product.
 The result? They both work great. While the flavors in the cocktails have some differences, mainly there is more spicy clove in the St. Elizabeth than in my home version, they are not drastically different to say one would work better than the other.