• Skip to primary navigation
  • Skip to main content
  • Skip to primary sidebar

Stir & Strain

  • About
  • Recipes
    • Make or Buy
    • Gin
    • Mezcal
    • Rum
    • Tequila
    • Vodka
    • Whiskey
    • Wine
    • Low Rent Cocktail of the Month
  • Gift Guides
  • Cocktail Presets
  • Seasons
    • spring
    • summer
    • Fall
    • winter
  • Supplies

homemade gifts

Make It: Mocha Pecan Rum Balls

December 15, 2014 by elana 2 Comments

Make It: Mocha Pecan Rum Balls // stirandstrain.comIt’s that time of year where I put booze in baked goods and share the recipe with you!

This year I participated in the Great Food Blogger Cookie Swap once again. I was so set on making rum balls (it’s another thing I’m getting to cross off the “to make” list) that I didn’t really think about how well they would transport across the country. So, if you’re reading this and you received a box from me… apologies if they were either melted/smooshed/etc… Hopefully that shouldn’t matter cause you thought they tasted so good you ate them anyway.

cookie swap

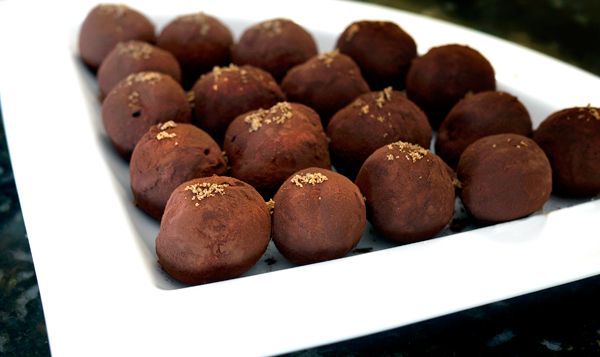
These rum balls are different from what I grew up with. Mostly they’re like fudge chock full of nuts and aged rum. Then rolled around in coffee flavored jimmies. Do you call them jimmies? Apparently these are one of those regional food items that every part of the country calls something else. You may know them as sprinkles. Or.. I dunno. What else do people call them? I also grew up eating American Chop Suey which apparently only people from Rhode Island and New Hampshire eat.Make It: Mocha Pecan Rum Balls // stirandstrain.com

There is no actual baking in this recipe. Yes, there’s a double boiler but all that is required of you there is to get some water hot and then stir for about 5 minutes. What I’m really saying here is don’t be afraid of the confection; it’s amazingly simple to make but looks super hard and that means people will fawn all over you for making this.Make It: Mocha Pecan Rum Balls // stirandstrain.com

I’m keeping this post short. It’s the holiday season! You all have a million other cookie recipes to make (or gawk at).Make It: Mocha Pecan Rum Balls // stirandstrain.com

Let’s do this!

Adapted from Carla Hall’s Rum Balls

1/4 cup aged rum, Brugal 1888 used here
6 ounces bittersweet chocolate (70%), finely chopped
4 tablespoons butter
1/4 cup pecans, toasted and finely chopped
1-1/2 cups powdered sugar
1 teaspoon instant espresso powder
1/2 teaspoon salt
coffee flavored jimmies for rolling

  1. Heat the rum in a small skillet over medium until reduce by half. Set aside.
  2. In a heat proof bowl, melt chocolate, espresso and butter over a double boiler (or if you don’t have one, a medium sized sauce pan with about an inch of simmering water with a stainless steel bowl on top will also work). Stir to combine.
  3. Remove from heat and stir in the pecans, rum, powdered sugar and salt until fully incorporated. Allow mixture to cool to room temperature. This can also be prepared a few days in advance and stored, covered, in the fridge. (If refrigerating, let mixture fully come to room temp before trying to scoop.)
  4. Portion dough into 1-inch balls and roll in sprinkles. Chill in an air tight container until ready to serve.

The consistency is very close to fudge with lots of crunchy bits from the pecans. While present in flavor, the rum takes a backseat and is pretty subtle. If you want more punch from the rum, then increase rum by a tablespoon before reduction.Make It: Mocha Pecan Rum Balls // stirandstrain.com

Happy holidays guys! I hope you try your hand at making these!

Share this:

  • Click to share on Pinterest (Opens in new window) Pinterest
  • Click to share on Facebook (Opens in new window) Facebook
  • Click to share on X (Opens in new window) X
  • Click to email a link to a friend (Opens in new window) Email
  • Click to print (Opens in new window) Print
  • Click to share on Tumblr (Opens in new window) Tumblr
  • More
  • Click to share on LinkedIn (Opens in new window) LinkedIn
  • Click to share on Reddit (Opens in new window) Reddit

Like this:

Like Loading...

Filed Under: Make It, Recipes Tagged With: Brugal 1888 aged rum, chocolate, coffee, espresso, fbcookieswap, homemade gifts, make it, pecan, rum

Make It: Meyer Lemon Bitters

February 25, 2014 by elana 7 Comments

Make It: Meyer Lemon Bitters // stirandstrain.comIt’s Tuesday, so I bet you’re already thinking about the weekend by this point in the day. So how about a fun DIY project to start planning? That involves doing something with all that winter citrus you have hanging out in your fruit basket? Making bitters might seem like a daunting task, but a lot of it is just sitting around waiting for it to be done already. Kinda like Limoncello (or Tangelocello). And, this recipe yields enough that you can bottle up and give away some as gifts. Those people will think it took you forever, but you don’t have to tell them how easy this is.

My recipe is based off of B.T. Parsons’ recipe found in his essential book on bitters, aptly titled “Bitters“. I made his version last year to the letter and enjoyed the results, however, I found that this year I wanted a version less sweet and delicate, and more bitter with richer citrus notes. So that’s what you’re getting here.

Make It: Meyer Lemon Bitters // stirandstrain.comA couple of tips to help you along the way: First, use a vegetable peeler to zest the citrus. Using a light hand while peeling will help keep the pith on the fruit and not on the zest (YOU want to control your bitterness in the recipe, not the fruit). Second, invest in some cheesecloth. A small amount of cheesecloth will go a long way in keeping unwanted particles from entering your final product, and you’ll find plenty of other uses for it in the kitchen. And lastly, if any of these ingredients have you scratching your head, they’re all available online.Make It: Meyer Lemon Bitters // stirandstrain.com

Adapted from the book “Bitters”
Yields approximately 18 ounces
zest from 4 meyer lemons
zest from 1/2 bitter orange (such as Seville)
zest from 1 lemon
2 tablespoons dried lemon zest (see note below)
1/2 tablespoon dried orange zest
4 green cardamom pods, lightly crushed
1 teaspoon dried ginger (do not use powder, see note on dried citrus)
1/4 teaspoon whole coriander
1/4 teaspoon whole white pepper
4 – 5 dried Dried Kaffir Lime Leaves
3/4 teaspoon gentian root
1/4 teaspoon whole fennel seeds
2 cups high proof vodka (I have access to 150 proof everclear in California, however, 100 proof vodka would also work)
1 cup water

  1. To make dried citrus, zest 4-6 large lemons (2 oranges or peel a 1″ nub of ginger and slice). Chop peel and lay on a baking sheet in an oven set at 250°F for 1 hour. Peel should be completely dry but not brittle. Dried lemon zest is also available commercially.
  2. In an airtight container, combine all of the zest, cardamom, ginger, coriander, white pepper, lime leaves, gentian root, and fennel seed. Pour vodka over the ingredients and seal container. Swirl to combine. Keep the container in a cool, dark place for two weeks, swirling mixture once daily. (I find it helps to set a calendar reminder also at this point.)
  3. After two weeks, strain out solids and set aside. Strain liquid through a cheesecloth to remove any particles left and transfer to an airtight container. Store in a cool, dark place. In a small sauce pan, combine solids with water and bring to a boil over medium high heat. Once boil is reached, turn heat to low and let simmer, covered, for 10 minutes. Remove from heat and let cool. Once cool, pour contents of the pan into a separate airtight container and let sit one week.
  4. After a week, strain out solids through a cheesecloth-lined fine mesh strainer. Add to the original liquid that has been set aside. Let sit at room temperature for 3 days and skim off any residue that accumulates at the top. Strain again if there is any leftover sediment and bottle into dropper bottles for storage.

Meyer lemons have a more pronounced floral aroma, as opposed to just a regular lemon, which tends to be more astringent. To pierce the perfumy nature of the meyer lemons, the kaffir lime leaves give a nice punch and aroma, while the bitter orange, fennel and spices create earthy undertones for balance.

I add a few drops to a Gin & Tonic, and they can be used as a sub for recipes using regular lemon bitters. Experiment and see what cocktails work for you!

*This recipe originally appeared on the Serious Drinks site.

Share this:

  • Click to share on Pinterest (Opens in new window) Pinterest
  • Click to share on Facebook (Opens in new window) Facebook
  • Click to share on X (Opens in new window) X
  • Click to email a link to a friend (Opens in new window) Email
  • Click to print (Opens in new window) Print
  • Click to share on Tumblr (Opens in new window) Tumblr
  • More
  • Click to share on LinkedIn (Opens in new window) LinkedIn
  • Click to share on Reddit (Opens in new window) Reddit

Like this:

Like Loading...

Filed Under: Make It, Recipes Tagged With: bitters, everclear, homemade gifts, lemon bitters, lime, make it, meyer lemon, orange, spices, winter

Bake It: Molasses, Cocoa Nib and Black Strap Rum Cookies

December 11, 2013 by elana 2 Comments

Molasses, Cocoa Nib & Black Strap Rum Cookies // stirandstrain.com

Santa gets cookies and a cocktail at our house.

Panic. Panic is setting in as I look at the calendar and realize that Christmas is in two weeks and I haven’t even sent out cards yet. But I did make a batch of holiday flavored cookies and my house smelt amazing the whole time. That should be all we need during the season, houses filled with the smells of cinnamon and ginger. And rum. Cookies should have rum in them too.

The Great Food Blogger Cookie Swap 2013

And I did that for my first time participating in the Great Food Blogger Cookie Swap.

Secret Ingredient: RUM

Secret Ingredient: RUM

Molasses, Cocoa Nib & Black Strap Rum Cookies // stirandstrain.com

More secret ingredients: cocoa nibs

But you’re a cocktail blog! I know! But sometimes there are food goodies on here and this was for charity and also: I love cookies.

Fresh grind your cardamom please.

Fresh grind your cardamom please.

Right from the beginning of this challenge I knew I wanted to make molasses cookies. They ship well and combined with Black Strap Rum they are filled with deep, dark, molasses-y goodness. So that’s what I sent. Of course there was a hiccup; the first batch accidentally got much more cardamom then they should have and ended up in the garbage. Seriously guys, a little cardamom goes a LONG way. The next batch however was perfect: nicely spiced, smelled divine, and they were edible. The 3 recipients also got a couple extra cookies thrown in because they ended up being smaller than first anticipated and I am nice like that.Molasses, Cocoa Nib & Black Strap Rum Cookies // stirandstrain.com

Let’s get to the baking!

Yields about 60 1″ cookies
Recipe inspired by Williams Sonoma

2-1/4 cups all-purpose flour
2 tsp. baking soda
1 tsp. ground cinnamon
1 tsp. ground ginger
1/2 tsp. ground nutmeg
1/2 tsp. ground allspice
1/4 tsp. ground cardamom
1 tsp. vanilla extract
1/4 tsp. salt
12 tbsp. (1 1/2 sticks) unsalted butter, at room temperature
1 cup firmly packed dark brown sugar
1 egg
1/4 cup molasses
1-1/2 tbsp. Cruzan Black Strap Rum
1/2 cup Valrhona Cocoa Nibs
1/2 cup white or clear sugar crystals

  1. In a medium sized bowl, whisk together flour, baking soda, cinnamon, ginger, nutmeg, allspice, cardamom and salt. Set aside.
  2. In a large bowl, using an electric mixer set on medium speed, beat together the butter and brown sugar until fluffy. Beat in the egg. Then beat in molasses, vanilla and rum. Reduce the speed to low and add the flour mixture, mixing until blended. Cover the bowl and refrigerate overnight.
  3. Preheat an oven to 350° F.
  4. Cover 3 half sized sheet pans in parchment. Using a 100 size disher, scoop out cookie dough onto sheet pans. Once dough has been scooped, by hand round out scoops into balls, toss in a small bowl filled with the sugar crystals and flatten out the ball into discs about 1/4″ thick. Refrigerated for 20 minutes.
  5. Move the sheet pans directly from refrigerator into the pre-heated oven and bake for approximately 12 minutes.
  6. Remove from oven and let cool on sheets for about 10 minutes and then transfer cookies to a cooling rack.
  7. Once cool, cookies can be stored in an air-tight container at room temperature for up to one week.

Molasses, Cocoa Nib & Black Strap Rum Cookies // stirandstrain.comThe rum here accentuates the already present molasses. These are pretty much what I think of/what I want in a holiday cookie. They are fragrant with spices, not too sugary and are small enough that I can eat a handful without thinking twice. I hope all my recipients enjoyed their batches, and I hope that you try a batch this year.Molasses, Cocoa Nib & Black Strap Rum Cookies // stirandstrain.com

Share this:

  • Click to share on Pinterest (Opens in new window) Pinterest
  • Click to share on Facebook (Opens in new window) Facebook
  • Click to share on X (Opens in new window) X
  • Click to email a link to a friend (Opens in new window) Email
  • Click to print (Opens in new window) Print
  • Click to share on Tumblr (Opens in new window) Tumblr
  • More
  • Click to share on LinkedIn (Opens in new window) LinkedIn
  • Click to share on Reddit (Opens in new window) Reddit

Like this:

Like Loading...

Filed Under: Bake It, Recipes Tagged With: bake it, cardamom, cocoa nibs, cruzan dark rum, fbcookieswap, ginger, homemade gifts, molasses, vanilla

Make It: Bourbon Vanilla Caramel Sauce

October 22, 2013 by elana 17 Comments

Vanilla Bourbon Caramel Sauce // stirandstrain.comAbout this time every year I start mentally writing an inventory of things I should start making for Holiday gifts. I have to think about it this early because I usually forget until about a week before Christmas, freak out, and consult the list I made two months ago. This is just how I deal with life and presents.

I was totally that kid that baked for the holidays and passed out cookies and got my teacher a Valentine’s Day gift bag (admittedly only once for that. But she was a great teacher and it was an excuse to buy heart colored tissue paper.) and since starting this blog and just, well, making A LOT of stuff, I’ve been going full force at edible gifts for the Holiday season. Rewind back to a few weeks ago and you will find me wide-eyed in front of a steaming sauce pan of sugar and butter and other deliciousness. Myself and a friend decided to take a caramel making class, the selling point for me was the “Beer and Pretzel” caramels on the list of what we would make. Seriously. Beer reduction and pretzels and caramel living together in one bite-sized wrapper. Oh, but the wrappers. The only aspect I wasn’t prepared for in this class, after spending two or almost three hours making caramels, was the hour long process of individually wrapping each damn caramel I made. After an hour I was kinda done with caramels for the time being and I brought them all in to my office the next day. The beer ones being the surprise hit.

One of the last recipes we tackled that night was not actually a candy, but a sauce: caramel sauce (it was, after all, a caramel class). This sauce made its way into a cake about 3 days later. And now it is making its way here to the site. Why? Because I’ve decided to add some Bourbon and vanilla beans to it and make jars of it for presents this year. Friends, you are welcome. Try not to eat the whole jar in one sitting.

Are you thinking this is going to be too hard? It’s not. I had one hand holding a cell phone trying to pay attention to my mother while she went on about something for 45 minutes and started and finished this whole recipe by the time I got off the phone with her. That includes prep by the way.

Don’t want to give this as a gift? Ok, put it on ice cream, or sandwich it between cookies, or DO YOU REALLY NEED A REASON FOR CARAMEL SAUCE?!bourbon-caramel-3Vanilla Bourbon Caramel Sauce // stirandstrain.com

Caramel is boiling sugar. The recipe moves quickly so get all your ingredients together before you start and please, try not to spill it on yourself, it will hurt like hell.

Adapted recipe from The Gourmandise School
1-1/2 cups sugar
2 tbsp unsalted butter, Plugra is awesome and used here
1 cup heavy cream, room temp
1 tsp lemon juice
1/4 cup water
1 tsp fleur de sel, Murray River used here
1 oz. Buffalo Trace Bourbon
Seeds from one vanilla bean, or 1 tsp of vanilla bean paste

  1. In a heavy bottomed sauce pan, combine sugar, water, vanilla seeds (or paste), and lemon juice. Stir once to combine. On medium high heat, cook until sugar dissolves, brushing the sides of the pan with a damp pastry brush if sugar crystals stick to the sides. Bring to a boil, undisturbed (do NOT STIR), until sugar reaches a dark amber color. (This can take anywhere between 10-20 minutes. Whatever you do, don’t leave the pan. It will almost always burn if you step away.)
  2. Carefully add the cream. It will bubble and hiss like crazy, but this is normal. Bring back to a boil, then add in butter, salt and bourbon. Stir to combine and until slightly thickened, about 3-5 minutes.
  3. Let cool and then jar up.

Here’s a few notes:

  • Your sauce is going to look watery at first. Don’t keep cooking it. If you pull a spoon out of the sauce and it leaves a layer, your sauce is thickened. As it cools it will thicken up much more. And once you stick it in the fridge, the next day it’s even more thick.
  • DO NOT STIR IT WHILE IT COOKS. Just don’t, it will create crystals and it will be grainy and gross.
  • The bourbon is added at the end, so you will taste it. That is the point of adding it to the sauce. Don’t like bourbon? You can add an aged rum if you like. Or just leave out the booze too if you have to.
  • Besides the lovely bourbon taste, mainly you are going to get a buttery, salted caramel with hints of vanilla. And you will keep telling yourself, One more spoonful, until there is nothing left.Vanilla Bourbon Caramel Sauce // stirandstrain.com

Share this:

  • Click to share on Pinterest (Opens in new window) Pinterest
  • Click to share on Facebook (Opens in new window) Facebook
  • Click to share on X (Opens in new window) X
  • Click to email a link to a friend (Opens in new window) Email
  • Click to print (Opens in new window) Print
  • Click to share on Tumblr (Opens in new window) Tumblr
  • More
  • Click to share on LinkedIn (Opens in new window) LinkedIn
  • Click to share on Reddit (Opens in new window) Reddit

Like this:

Like Loading...

Filed Under: Make It, Recipes Tagged With: bourbon, Buffalo Trace Bourbon, butter, caramel, cream, Fall, holiday, homemade gifts, make it, vanilla

Make It: Kiss of Fire (Aperol and Cayenne Jellies)

August 19, 2013 by elana 1 Comment

Kiss of Fire Aperol Jellies // stirandstrain.comOverachiever. Two posts for Mixology Monday and you can start to attribute that to yourself. I’m not officially submitting this, since it’s an alcoholic dessert, but the FIRE theme this month is the reason why this post went up.

I’ve actually had this idea in my back pocket for awhile now. There was this recipe in the Los Angeles times online for Prosecco gelee and I knew I’d have to make them sometime with some liquor. The time had to be right, and the flavors needed to make sparks (otherwise it would just be a fancy jello shot).

Kiss of Fire Aperol Jellies // stirandstrain.com

In the Eyes of Angelique post, I started to play around with Campari and cayenne in a foam, and when that combination came together, I thought I would try a more straight on approach to the flavors, more concentrated, and Aperol and cayenne seemed like the duo to try. There is a touch of chipotle powder in there to bring an earthiness to the sweet, bitter and hot flavors.

This might seem like a project, but it’s really hands off, and the sugar coating is optional. In fact, here’s a tip with that. If you do go the way of sifting the jellies with sugar, coat them twice. There is an issue with something called ‘weeping’ that happens when the sugar starts to melt a bit (after they’ve sat for awhile). So if you do sugar them, coat twice and then eat immediately! Otherwise the unsugared jellies will stay firm in the fridge up to 4 days, covered.Kiss of Fire Aperol Jellies // stirandstrain.com

Recipe adapted from L.A. Times
3/4 cup sugar
3/4 water
12 oz. Aperol
3/4 tsp cayenne
1/4 tsp chipotle powder
9 sheets of gold gelatin

Combine sugar and water in a sauce pan. Bring to just about a boil and remove from heat. Soften gelatin sheets in a bowl of water for 2 minutes, ring water out and mix them into the sugar syrup. Stir until gelatin is dissolved. Add Aperol, cayenne and chipotle powders to the syrup and stir to combine. Line a 8″x8″ pan with plastic wrap and pour mixture into the pan. You can also pour into individual silicone molds. Refrigerate overnight to set. To serve, cut into squares.

Optional sugar coating:
Pour a 1/2 cup of granulated sugar into a bowl. Add jellies a few at a time to coat. Shake off excess and coat a second time. Serve immediately.

Each little square has the sweet bitter flavor of the Aperol, but with an earthy fire from the powders. That cayenne heats hits the back of your throat for a nice spicy bite. You do not need to sugar coat them, but if you do, you could pass them off as elegant candies.

Share this:

  • Click to share on Pinterest (Opens in new window) Pinterest
  • Click to share on Facebook (Opens in new window) Facebook
  • Click to share on X (Opens in new window) X
  • Click to email a link to a friend (Opens in new window) Email
  • Click to print (Opens in new window) Print
  • Click to share on Tumblr (Opens in new window) Tumblr
  • More
  • Click to share on LinkedIn (Opens in new window) LinkedIn
  • Click to share on Reddit (Opens in new window) Reddit

Like this:

Like Loading...

Filed Under: Make It, Recipes Tagged With: aperol, cayenne, chipotle, dessert, gelatin, homemade gifts, make it, mixology monday

Bake It: Irish Whiskey Truffles with Baileys Crystals

March 15, 2013 by elana 3 Comments

Jameson Whiskey TrufflesThis year, while thinking of a St. Patrick’s day cocktail I recalled a post on a website that made chocolate, whiskey, and beer cupcakes. They’re fantastic, albeit a lot of work, FYI. And as much as I wanted to do something similar for the Low Rent Cocktail of the Month in March, I thought something less obvious would be better for my Irish Holiday. But something with Irish Whiskey all the same.jameson-truffles-1

So this month we’re ‘baking’ up the alcohol and throwing it into truffles. Chocolate Truffles can look amazingly elegant, but let’s not kid ourselves. They are chocolate we melt, let it get hard again and form into balls which we eat by the handful. Not as much work as those cupcakes but just as nice looking.

Taking it a step further I also dehydrated (as best as I could) Baileys Liqueur to keep with the Irish-ness of this alcoholic dessert. Initially I was going to fill the truffles with the Baileys until I saw this post on the Alcademic’s blog, where I learned about the world of dehydrating liquors for cocktails. Totally blew me away as I now had a new concept to play with.

Dehydrating the Baileys though was tough. Keeping the basic rules to follow from that post, I still ended up keeping it in the oven for about 36 hours at 170° and all of the liquid never fully dehydrated. However, enough did for a lovely crunchy topping to put on the truffles, so not all was lost. One change for the next time I dehydrate liquor (or a liqueur), is to keep it in a thinner layer. I found that the bottom liquid stayed gelatinous under the top crust that crystallized first. Best advice for any of you wanting to try this is to test several times to see what works best in your oven!

jameson-truffles-3I use a 1/4 cup of Jameson in this recipe. That might seem like too much, but the flavor becomes very subtle as it is mixed into the chocolate and cream. It is definitely there, but not blaringly WHISKEY. If you want more of that flavor, slowly try adding in more and tasting as you go. Keep in mind that the whiskey does not cook out, since it’s added in at the end, so let’s keep this dessert 21+.jameson-truffles-2 jameson-truffles-4jameson-truffles-7

Recipe adapted from Food Network
8 oz Extra Bitter Chocolate (Callebaut 70.4%), finely chopped
4 oz Semi-Sweet Chocolate (Callebaut 53.8%), finely chopped
2/3 cup heavy cream
1/4 cup Jameson Irish Whiskey

For Garnish:
1/2 cup Valrhona Unsweetened Cocoa Powder
Baileys Irish Cream, dehydrated and ground into a powder (see recipe below)

  1. Place chocolates in a medium sized heat-proof bowl. Set aside. In a 1-1/2 quart saucepan, heat cream on the stove until boiling and immediately pour the cream over the chocolate. Let sit for five minutes. Stir chocolate until smooth. If, like me, you did not chop your chocolate fine enough, you may need to create a double boiler (by placing your bowl of chocolate and cream over a sauce pan of simmering water) and reheat chocolate until fully melted. Try and chop it fine on the first try. Stir in Jameson. Mixture will look separated, however keep stirring until smooth- it will happen.
  2. Refrigerate for about an hour until firm but not rock solid.
  3. Line a baking sheet with parchment paper. Using a disher, or spoon, portion out the chocolate mixture into balls around an 1″ in diameter. I was able to get roughly 30 balls. Refrigerate again for 15 minutes. Pour cocoa powder in a shallow bowl.
  4. Take the truffles out and either toss directly into the cocoa powder as is using a fork to move around and coat the truffle, or smooth out the truffles into smooth balls and then coat in the cocoa powder. Coat the top of the truffles with ground Bailey’s crystals working quickly by hand. Your fingers will create some heat that might make the crystals warm and sticky. If you find this happening while you coat the truffles, refrigerate the mixture for 5 minutes and take back out again to finish.

Dehydrated Baileys Irish Cream

1/4 cup Baileys Irish Cream

Set oven to 170°. Pour Baileys into a silicon container and place into oven. As mixture starts to solidify on top, break up top bits to expose all of the liquid. Test for doneness starting after 18 hours. Like I mention above, my mixture hit its wall at 36 hours as some of the mixture was more like a caramel and never dried out. Remove from the oven and allow to cool. Break up all of the crystalized parts and, using a mortar and pestle, grind the mixture into a powder. Refrigerate in an air tight container until ready to use.jameson-truffles-5

By combining the extra bitter and semi-sweet chocolate, these truffles are not too sweet, but have a deep earthiness from the dark chocolate with a hint of sweetness and the subtle flavor of the Jameson. The crunchy bits of the Bailey’s on top provide a touch of caramel sweetness.

Share this:

  • Click to share on Pinterest (Opens in new window) Pinterest
  • Click to share on Facebook (Opens in new window) Facebook
  • Click to share on X (Opens in new window) X
  • Click to email a link to a friend (Opens in new window) Email
  • Click to print (Opens in new window) Print
  • Click to share on Tumblr (Opens in new window) Tumblr
  • More
  • Click to share on LinkedIn (Opens in new window) LinkedIn
  • Click to share on Reddit (Opens in new window) Reddit

Like this:

Like Loading...

Filed Under: Bake It, Recipes Tagged With: Baileys Irish Cream, chocolate, cocoa, cream, homemade gifts, jameson, St. Patrick's Day, whiskey, winter

Bake It: Angostura Bitters & Luxardo Cherry Brownies

December 17, 2012 by elana 3 Comments

Sometimes we do this thing at my house where we’ve decided we want to be healthier and get rid of all the ‘unhealthy’ snacks in the house. So suddenly there is no more processed goodies about. We’re left with a container of unsweetened cocoa powder and a bag of semi-sweet chocolate chips shoved in the back of the fridge. All you bakers out there are rolling your eyes and saying ‘yeah, and?‘ right about now. What I’m left with is two main ingredients to make a whole bunch of desserts and unhealthy foods. The challenge though, is to actually make something from scratch.

I love to bake, but I don’t get to do it as much as I used to. Now I’m mainly focused on cocktails. Then I decided to marry the two.

When I realized there was nothing to snack on at the house I went in search for a quick and easy recipe I could throw together with not much effort but be satisfied with the end result. I remembered I’d seen on Shutterbean a pretty straightforward brownie recipe that would accomplish both goals. But I wanted to put my own spin on it. Also, I wanted something my husband would want to eat and that meant throwing some kind of fruit into it and getting the walnuts out (otherwise I’d be staring the pan down with no regrets). Lately he’d been on a cherry kick and as an afterthought, I figured I would stick a couple cherries on top. Then I spotted the bottle of Angostura bitters and I had an idea. My first batch had a 1/2 ounce, but I found I wanted the bitters to be stronger throughout the brownies. Then I threw in a whole ounce and it was magic.

(recipe adapted from Shutterbean.com)

½ cup (1 stick) unsalted butter
4 ounces semisweet chocolate, chopped
4 ounces bittersweet chocolate, chopped
1/4 cup cocoa powder
1/2 teaspoon baking powder
1-¼ cups sugar
1/2 teaspoon salt
3 large eggs
1 cup all-purpose flour (spooned and leveled)
1 oz. Angostura bitters
1 cup luxardo cherries (syrup drained off as much as possible)

Preheat oven to 350°. Spray a 8″ square baking pan with nonstick cooking spray. Line bottom and sides of the pan with parchment.

Mix flour, salt, cocoa powder & baking powder together in a bowl. Set aside.

Place butter and chocolate in a medium heatproof bowl set over (not in) a saucepan of simmering water; stir frequently, until almost melted. Remove from heat; stir until completely melted.

Whisk in sugar until smooth. Add bitters and stir to combine. Whisk in eggs. Fold in cherries. Gently whisk in flour mixture until smooth (do not overmix).

Spread batter evenly in prepared pan. Bake until a toothpick inserted in center comes out with a few moist crumbs attached (they should form a ball when rolled between your fingers), 50 – 55 minutes. Cool completely in pan.

Use parchment paper to lift from pan; peel off and discard. Cut into squares (this is much easier to do with these brownies if you stick them in the freezer after they have cooled slightly for about 20 minutes).

I found that adding the bitters and the cherries made the batter a bit thicker and took more time to bake thoroughly. I would start checking on them at about the 50 minute mark and test every 5 minutes after. The end result is a fudgy brownie that has some super spicy notes from the bitters, and with the cherries, are reminiscent of chocolate covered cherry cordials. I decided to split the chocolate between semisweet and bittersweet to cut a bit back on the richness and try to highlight more of the spice. They really make a great holiday brownie too (I’ve now made this enough times over the past two weeks that I have the recipe memorized and could make them in my sleep).

Share this:

  • Click to share on Pinterest (Opens in new window) Pinterest
  • Click to share on Facebook (Opens in new window) Facebook
  • Click to share on X (Opens in new window) X
  • Click to email a link to a friend (Opens in new window) Email
  • Click to print (Opens in new window) Print
  • Click to share on Tumblr (Opens in new window) Tumblr
  • More
  • Click to share on LinkedIn (Opens in new window) LinkedIn
  • Click to share on Reddit (Opens in new window) Reddit

Like this:

Like Loading...

Filed Under: Bake It, Recipes Tagged With: angostura, bake it, brownie, chocolate, holiday, homemade gifts, luxardo cherries, winter

Make It: Holiday Spice Syrups

November 12, 2012 by elana 2 Comments

Make It: Holiday Spice Syrups // stirandstrain.comThe hard ciders and Glogg are starting to roll out. It’s Fall- hell, it’s almost Thanksgiving already. For me that means starting to plan for Christmas. My personality is such that I painfully start planning things much too far in advance, forget about them, and freak out at the last minute trying to get these plans into action.

A good chunk of gift giving is pretty easy actually when it comes to my friends. They all like booze. But really, putting a bow on a bottle of Jameson a couple years in a row starts to become too easy and predictable. Yes, you can step it up and maybe shell out for a bottle of Booker’s. However that becomes expensive when you multiply that by just 4 people.

When I started making my own infused syrups at home it occurred to me the potential these had for gift giving. One can make up a batch, pair it with a small bottle of something, and write up a little card with a drink recipe on it. For me, it’s a way of sharing an interest with my friends and getting them tipsy in the process. Win! Even better when you can open it together.

This year I’m expanding my usual arsenal of syrups to include some Fall spices that I want to try out. Adapting the clove syrup recipe from the PDT Cocktail Book, I’ve scaled that down and also worked up a cinnamon syrup too. Bottle these up and give away, or keep for yourself.

For this recipe, I made a master batch of simple syrup and then divided it to steep the cloves and cinnamon separately.

Master Simple Syrup

1 cup water
1 cup sugar

Combine water and sugar in a sauce pan. Swirl to combine and place over high heat until warmed through and transparent. Do not let it come to a boil. Once sugar is dissolved, remove from heat if using immediately for below or keep over a very low flame- you will need the syrup to be warm to infuse.

Clove Syrup

1/2 cup simple syrup
1/4 oz of cloves (I used a kitchen scale to weigh this out. It’s about 3 tablespoons if I were to eyeball it.)

Combine a half cup of the warm simple syrup with the cloves in a heat-proof container. Let sit for 15 minutes. Strain into a bottle through cheesecloth or a fine sieve. Let the mixture cool and store in the refrigerator.

Cinnamon Syrup

1 cup simple syrup
5 sticks of cinnamon, 2″ to 2-1/2″ in length

Combine a half cup of the warm simple syrup with the cinnamon sticks in a heat-proof container. Let sit for 15 minutes. Strain into a bottle. Let the mixture cool and store in the refrigerator.

Syrups will keep approximately 1 month in the refrigerator (or at least they do in my house).

Share this:

  • Click to share on Pinterest (Opens in new window) Pinterest
  • Click to share on Facebook (Opens in new window) Facebook
  • Click to share on X (Opens in new window) X
  • Click to email a link to a friend (Opens in new window) Email
  • Click to print (Opens in new window) Print
  • Click to share on Tumblr (Opens in new window) Tumblr
  • More
  • Click to share on LinkedIn (Opens in new window) LinkedIn
  • Click to share on Reddit (Opens in new window) Reddit

Like this:

Like Loading...

Filed Under: Make It Tagged With: cinnamon, clove, Fall, holiday, homemade gifts, make it, PDT, simple syrup

Make It: Basil Liqueur

March 15, 2011 by elana 3 Comments

Apologies if I am incorrectly naming this delicious bottled beverage. Not sure what to call it once you add the simple sugar to the … tincture? Eh, someone someday will correct me on this.

This recipe comes from my friend John the moonlighting landscapist. It was a Christmas gift for me and my husband. Booze. Can’t give me a more enjoyable gift. Well, there may be a couple items that top higher, but we don’t need to go into those right now.

If the idea of drinking BASIL puts you off, you shouldn’t worry. The taste is not basil smacking you upside the head. It’s gentle and sweet and you can almost taste some citrus in the back there. It’s great on its own straight out of the freezer, or as you will see THIS WEEK, it is also tasty in mixed drinks. Here’s how to make it:

750 ml everclear (this was made from some bathtub hooch that John got up in Montana- a family recipe I believe. I suggest a very high proof vodka or if you can get it straight grain alcohol.)
basil leaves (enough to pack the bottle)

Pack the everclear with as much of the basil leaves that will fit in there and recap the bottle. Let them sit together in a cool, dark place for 4 days, shaking the bottle every day. Strain the liquid through a double layer of cheese cloth into a clean container for storing. You can toss out the basil leaves… I can’t think of anything you could do with them. If you do, let me know!

Next you need to make a half strength simple syrup. To do this, take 750 ml of water, combine with 350 grams of sugar in a sauce pan and bring to a simmer. Turn off heat, stir the mixture to dissolve any remaining sugar crystals and leave to cool to room temperature. Combine the simple sugar mixture to the basil liquid, cap it and stick it in the freezer.

Share this:

  • Click to share on Pinterest (Opens in new window) Pinterest
  • Click to share on Facebook (Opens in new window) Facebook
  • Click to share on X (Opens in new window) X
  • Click to email a link to a friend (Opens in new window) Email
  • Click to print (Opens in new window) Print
  • Click to share on Tumblr (Opens in new window) Tumblr
  • More
  • Click to share on LinkedIn (Opens in new window) LinkedIn
  • Click to share on Reddit (Opens in new window) Reddit

Like this:

Like Loading...

Filed Under: Make It, Recipes Tagged With: basil, everclear, homemade gifts, make it, sugar

Make It: Rosemary Lavender Simple Syrup

March 7, 2011 by elana 2 Comments

Rosemary Lavender Simple Syrup for use in the Springtime Gin Fizz.

2 cups water
1/2 cup sugar (I used organic golden sugarcane, but ehhhh… you can use white, it’s just what I had on hand)
4 sprigs of rosemary
1 teaspoon of lavender buds

Wash and dry your herbs. In a saucepan that seems much too large to hold such little liquid, throw in the water, sugar and herbs. Swish to combine. It’s not necessary to thoroughly dissolve the sugar. That will happen soon enough. Bring the mixture to a soft boil (not rolling), then turn down to simmer for 2 minutes. Remove from the heat and let stand for 10 minutes. Fine strain your mixture into a glass container. I prefer one with a spout (I usually just pour into a pyrex measuring glass) since I will transfer this into a couple different jars. One for a present, and then one bottle with a pour spout for drinks.

Note: There is so much debate over simple syrups (Cocktail Culture has a nicely compiled list of several arguments), and since I don’t claim to be an expert on any of this I am just using the same recipe I was following for the original recipe. It tastes good and worked for me with no problems. The original recipe says it will last up to one week in the fridge, but again, as with other syrups, I find that the boiling process does some kind of scientific mojo that lets it sit perfectly fine in my fridge for at least a month. However, this mix is going straight into the next drink recipe…here.

Share this:

  • Click to share on Pinterest (Opens in new window) Pinterest
  • Click to share on Facebook (Opens in new window) Facebook
  • Click to share on X (Opens in new window) X
  • Click to email a link to a friend (Opens in new window) Email
  • Click to print (Opens in new window) Print
  • Click to share on Tumblr (Opens in new window) Tumblr
  • More
  • Click to share on LinkedIn (Opens in new window) LinkedIn
  • Click to share on Reddit (Opens in new window) Reddit

Like this:

Like Loading...

Filed Under: Make It, Recipes Tagged With: homemade gifts, lavender, make it, rosemary, sugar

  • « Go to Previous Page
  • Go to page 1
  • Go to page 2
  • Go to page 3
  • Go to Next Page »

Primary Sidebar

Stay in Touch

  • Bloglovin
  • Facebook
  • Instagram
  • Pinterest
  • RSS
Classic Cocktail Presets // stirandstrain.com

Recent Posts

  • Coming back online // you can’t wear a mask and drink at the same time
  • Home Bar Spring Favorites
  • Monday Booze News A new low-abv drink to try, jello shots for St. Patrick's Day, and getting to know Tennessee whiskey
  • Monday Booze News All about Chartreuse, sleep where your beer is made, and more tiki mugs you'll want to buy!
  • Tequila Cazadores: Cristalino Launch
  • Mixed Citrus Margaritas for Margarita Day Learn to make a squash syrup (no, not the vegetable!)
  • Building a Home Bar: Keeping Cool with the Newair Premiere Line Fridge
  • Monday Booze News Presidents Day Drinking Edition


Copyright © 2025 Stir and Strain .
All rights reserved. Original photography may not be used without prior written permission.
Alcoholic drinks are intended for adult use only. Mind your local drinking laws.

%d